Tuesday, August 17, 2010

A Walk in the Park


A few weeks ago my brother, two of our friends and myself went backpacking/camping for the weekend in Allegheny National Forest. This isn't pay 10 bucks for a campsite, buy some firewood and set up a tent next to your car. We pack up our backpacks with hopefully enough supplies to last us the weekend, hike in to the forest, say this random spot looks good for a campsite, and don't look back until the end of the weekend. Over the whole weekend we hiked about 7 miles, and our resident woodsman friend, Arko, claims the change in elevation from the lowest part of the trail to the highest part is over 1000 feet. I love a weekend like this. For me there's nothing like leaving behind everything for a weekend and just being in nature, out in the wild. We had a great time, got way to drunk Friday night, didn't think we would move from our first camp site Saturday morning, but had reviving swim in the a river and actually ended up hiking for 3-4 hours Saturday afternoon to a new campsite.


One of the best parts of going camping like this is, cooking over an open campfire. Who said you can't cook well in the wild, on Friday we had deer burgers (the deer caught and butchered by Arko last fall) prepared by Boz, and a deer stew that I threw together (I brought 2 onions, some baby yukon gold potatoes, garlic and some beef stock), oh yeah and a chocolate peanut butter cake that I brought, that as I was opening dropped icing side down on the ground. Saturday was a more traditional camp food day with hot dogs, bratwurst, and beans. I know for sure that the burgers were some of the best burgers I ever had, but by time the stew was ready I think I as well as everyone else were a little too drunk to know what the stew really tasted like (from what I can remember though it was pretty tasty).


One funny story, on the car ride to the forest we talked about how we had to hang all of our left over food and anything an animal (bear, bobcat, mountain lion, other carnivorous animals) might come around to forage, in a tree. My brother who worries about those kinds of things says there is no way he would get drunk enough or too tired to make sure everything was secured in a tree before we went to bed each night, well take a look how he passed out Friday night,


yeah he was ready for an attack (that is quite a spear, eh), that is if he would even be able to hear and be roused by anything in his drunken stupor. Somehow we did at least all manage to make it in to our tents that night. I guess a whole bottle of goldshlager, some Jim Beam Red Stag, vodka, some more of a different kind of whiskey and a 12 pack of Natty can have that effect on four campers.

The most amazing tank top ever (nothing better than a goofy outfit a manly camping trip)

The weekend was great though, we didn't run into much of any wildlife (we saw a salamander and a deer), ended up making a the whole 7 mile hike, and got to check out an absolutely amazing look out over the whole forest. This was my second time doing this camping trip in the summer, now were planning a trip for the late fall as well as a winter trip. We want to see how different the forest is in each of the different seasons.

Chances of encountering a ghost if brave enough to stay a night in this creepy old shed/barn/house 85%

Wildlife!


Eat well, Live well, while not becoming bear food

Wednesday, August 4, 2010

Vietnamese Pork Chop Sandwich (Banh mi)

The recipe for this sandwich looks like it has a lot of ingredients and may be a lot of work to put together, but most of the ingredients used are things you probably have on hand already (I only needed to buy the fish sauce, which is a good sauce to have in my pantry anyway). It's actually really easy to make, all it takes is mixing a few things together, marinating and grilling. I had one of these sandwiches when I was in New York City recently, at Nicky's Vietnamese Sandwiches, and thoroughly enjoyed, I knew I had to try and make it at home. Then when I came home I saw what looked to be a great recipe for the banh mi, on Food52, another one of the food blogs I follow, and knew it was time to give it a try. I don't know what was better about this recipe, the flavor of the pork, or the pickled carrots and jalapenos that are used to top the sandwich. These pickled vegetables were a real revelation and will be a technique that I will use a lot, because of how good they were, I think it is what makes this sandwich stand out. If you're in the mood for a sandwich and want something a little bit different, then definitely give this one a try, and you'll probably be making this all the time.


Vietnamese Pork Chop Sandwich
adapted from Caramelized Pork Banh Mi by monkeymom on food52
makes 1 large baguette sandwich
4 pork chops
3 tablespoons fish sauce
1 tbsp maple syrup
2 1/2 tbsp soy sauce
1/2 tsp sesame oil
4 garlic cloves, minced
1/2 tsp black pepper
1 tsp sriracha, or other hot sauce of your choosing
2 tbsp vegetable oil
1 french baguette
lettuce to top sandwich
pickled carrot and jalapeno
1-2 tbsp mayonnaise

Pound the pork chops to about an 1/8 to 1/4 of an inch thick.

In a bowl, mix fish sauce, maple syrup, soy sauce, sesame oil, garlic, black pepper, and sriracha. Then add the pork chops and allow to marinate for at least 10 minutes and up to a couple hours.

Bring grill up to medium high heat. When ready to grill the pork, allow excess marinade to drain off and brush pork with the vegetable oil. Since the pork is thin it will only need 2-3 minutes per side.


Assemble the sandwiches, spread the mayo one side of the baguette, top with the pork chops, then add the pickled carrots and jalapenos and some lettuce. Enjoy.


Pickled Carrots and Jalapenos
2 large carrots, chopped into matchsticks
4 jalapenos, chopped into matchsticks
1/4 cup water
1/2 cup rice wine vinegar
1 tbsp kosher salt
1 1/2 tbsp sugar

Seed and de-vein the jalapenos and chop them as well as the carrots into matchstick sized pieces.

In a bowl, mix the water, vinegar, salt and sugar.

Toss the carrots and jalapenos in the water and vinegar mixture and let sit for at least an hour.


Eat well, Live well

Tuesday, July 27, 2010

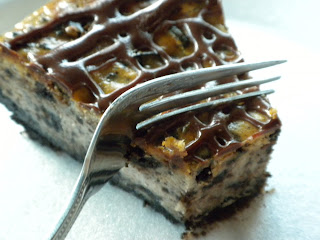
Ridiculous Oreo Cheesecake


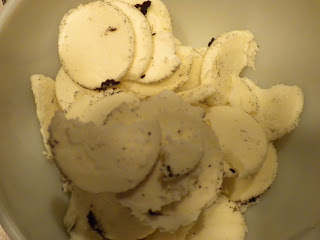
I like when I'm making something and as I am doing so, I start to get the feeling of a mad scientist, or that if the government was watching me create the concoction, I might just get a cease and desist order to stop immediately, it's too much, you can not legally put all that butter, cheese, cream and sweet together. That's how it was when I was making this cheesecake, there I am separating Oreo cookie from stuff, ending up with a pile of stuff, that in a more squeamish bakers kitchen may have went to waste.


Was I going to waste any of that stuff? Of course not, it went right into the cheesecake batter and layered on top of the crust before pouring the batter on the crust (it still blows me away that Oreo still offers a single stuffed cookie, and why have they not come out with triple or 4x stuffed Oreos yet, everyone knows the best part of an oreo is the stuff). I have a few other recipes that I've been meaning to post, but I made this cheesecake this past weekend and needed bump it to the front of the line. The recipe is loosely adapted from this brownie mosaic cheesecake recipe from Deb over at my favorite food blog, Smitten Kitchen. The idea for this cheesecake came from the Oreo ice cream at J.P. Licks, that I never could have too much of, and talked about in my Beantown post. With the Oreo ice cream from J.P. Licks you know you're eating ice cream, but if you closed your eyes you might think you were just eating a pile of Oreos. That's how I wanted this cheesecake to be, you know your were eating cheesecake, but the Oreo-ness of it was cranked up to maximum, and I think I succeeded. Just go out now buy the ingredients for this and make it yourself, it needs to be done.


*A few notes about the recipe. Deb made her cheesecake in a spring form cheesecake pan, I don't have one of those, so I just used a 9 inch circular cake pan. I lined the whole thing with parchment paper and it came out just fine, but I only ended up using about 2/3 of the cheesecake batter. I just poured the excess in a small parchment paper lined square glass baking dish (without any crust), baked it with the standard cake, and just had straight cheesecake (homie), which will be good to mix in with some ice cream, or just to eat straight up. If your going to use the 9 inch cake pan like I did and don't want the excess cheesecake (but who wouldn't) then I would suggest cutting each ingredient down by 2/3, except the ingredients for the crust.
Also about the cooking time. I ended up baking mine for over 60 minutes. Apparently it is hard to tell exactly when a cheesecake is fully cooked, because for the brownie mosaic cheesecake recipe, Deb suggests about 45 minutes, but for some of her other cheesecake recipes she suggests 55-60 minutes. I also was reading some of the comments on her cheesecake recipes and it seemed people trying her recipes were having the biggest problem with the cook time, and not being able to tell when their cheesecakes were done. Since I didn't want an undercooked pudding like mess on my hands, I went for a little overcooked, rather than a little undercooked. She says bake it until the cheesecake is set 3 inches from the edge, but still wobbly in the center (a jello-like wobble, not a liquid-like wobble), I went until the whole cake was just about set, and it didn't burn or dry out and the consistency was still great. I guess what I'm trying to get at is the bake time is just a suggestion, not set in stone, everybody's ovens cook differently, use your best judgement when baking your cheesecake.

Ridiculous Oreo Cheesecake
Adapted from some of Deb's cheesecake recipes at Smitten Kitchen
Makes 1 spring form pan cheesecake or 1 9 inch cake pan cheesecake with some more left over for fun


Crust:
1 package of doublestuffed Oreos, cookies separated from stuff and set in separate bowls
6 tbs of melted butter
1/3 c sugar
1/8 tsp salt


Cheesecake:
3 8 oz packages of cream cheese, softened
4 large eggs
2 tsp vanilla
1 cup sugar
1/4 tsp salt
about half of another package of double stuffed Oreos, plus stuff from first package


Chocolate Topping:
1 bar of good quality milk chocolate (I used Lindt)
2 tablespoons butter


For the crust place all of the separated Oreo cookies in a ziploc bag, with a few pieces of the stuff, and pound until finely ground.


In a mixing bowl, mix together the finely ground Oreos, melted butter, sugar and salt.


In the parchment lined cake pan (or greased spring form pan), press the cookie mixture in to the pan to form the crust. Bring it as far up the sides as you are able to, then layer with extra stuff from the separated cookies.


For the cheesecake filling, make sure the cream cheese is very soft (especially if whipping by hand like I did), and whip the cream cheese with the sugar and vanilla, until fully combined. Then add the eggs one at a time, until incorporated.


In a ziploc bag, place about half of the Oreos from a second package. Pound the slightly, just to break them up, then fold them with more of the stuff from the separated cookies used for the crust.


Pour the filling over the crust and bake for 55-60 minutes (see note above for more detailed cooking instructions).


Take cheesecake out of oven and allow to cool for about an hour. After about an hour, cover lightly and allow to set in the refrigerator for at least 3 hours.

When cheesecake is completely cool, melt chocolate over a double boiler and stir in butter. Drizzle over cheesecake and put back in to refrigerator so chocolate re-hardens.


Eat well, Live well

Thursday, July 22, 2010

Salmon cakes with Grilled Corn Salad


I've had this can of salmon sitting in the cupboard, for about the last month or two. I bought it intending to use it to make "polar bear fish biscuit treats" for the awesome Lost finale party I threw, but since I wasn't exactly sure how canned salmon tastes it the fish biscuits were on the bottom of my list of things to make, and I ended not having enough time to make them, thus the canned salmon collected dust in the cupboard. I wasn't exactly sure what to do with it, and thought to myself that I make crab cakes somewhat frequently, and I don't use the most choice crab meat for them (I'm a poor pharmacy student mind you), so I figured why not try make salmon cakes with the canned salmon. That's exactly what I did, and they turned out rather tasty if I do say so myself. I was a bit startled at first, when I opened and drained the can of salmon, then dumped it into a bowl, to find a bunch of bones in the salmon meat. I didn't let it turn me off though, a lesser man might have just thrown the canned salmon away and bought some fresh salmon filets from the grocery, but I was determined to make it work. So I diligently picked all of the big bones out and as many of the small, what I think were rib bones out as I could and continued on. I mixed the salmon with most everything I would to make crab cakes, except the old bay, grilled them up, stuck them on a roll topped with a slice of swiss cheese, and some avocado slices, had the grilled corn salad as my side (which was really, really good, definitely try it) and thoroughly enjoyed the creation I made.


Salmon Cakes
3-4 burger sized cakes
1 12 oz can of salmon (I'm not actually sure of the size of the can but the store I was in had two sizes of cans and I got the smaller can)
1 lemon
2 tbsp mayonnaise
1/2 cup panko bread crumbs
1/2 medium sweet onion, diced
2 garlic cloves, minced
1 egg
1/2 tsp cayenne pepper
a few dashes of hot sauce (I used sriracha)
salt and pepper
2-3 slices of bacon, cooked and cut into small stips
3- 4 slices of swiss (if making sandwiches)
1 avocado, sliced
1 lime


Open and drain the can of salmon, dump into a bowl, and pick out as many bones as you can. I'm not sure if all canned salmon has bones, so maybe look for a can that is boneless at the store, if not it really was a big deal to pick them out, I definitely didn't feel any in the cakes.

Mix the juice from the lemon, mayo, onion, garlic, egg, cayenne, hot sauce, and panko, in a bowl then with the salmon.

Form 3-4 patties with the mixture, cover and refrigerate for at least a half hour, and I would imagine you could do it overnight, to allow the cakes to firm up.

Bring the grill up to medium high heat, prior to cooking the salmon cakes.

Brush each side of the cakes with a little bit of oil and since the salmon is already cooked, just grill the cakes for about 3-4 minutes a side or until nice grill marks form.

*For the bacon preheat an oven to 325 degrees F and cook bacon for about 20-25 minutes until its to the crispness that you prefer.

**For the avocado slices, just mix the juice of the lime with a little bit of salt and mix with the avocado slices right after you slice it, so they don't turn that gross dark green/brown.


Grilled Corn Salad
5-6 servings
5 cobs of corn, with the husks on
1 orange pepper, diced (really any color pepper will do)
1 small red onion, diced
1 cucumber diced
1 small can of black beans
1 tomato, seeded and diced
Dressing:
1/4 cup olive oil
1/4 cup white wine vinegar
juice from 2 lemons
salt and pepper


Open the corn husks and brush cobs with olive oil, salt and pepper. Grill over medium heat for about twenty minutes, turning the corn occaisionally.

Cut the corn of the cob and combine with the other vegetables and the beans.

In a separate bowl combine all ingredients for the dressing, then toss with the salad. Allow to chill in the refrigerator and serve cool.


Eat well, Live well